你的浏览器禁用了JavaScript, 请开启后刷新浏览器获得更好的体验!
首页
热门
推荐
精选
登录
|
注册
KINavigationController使用演示例子
立即下载
用AI写一个
金额:
2
元
支付方式:
友情提醒:源码购买后不支持退换货
立即支付
我要免费下载
发布时间:2018-04-18
1人
|
浏览:2280次
|
收藏
|
分享
技术:Swift
运行环境:xcode9.0
概述
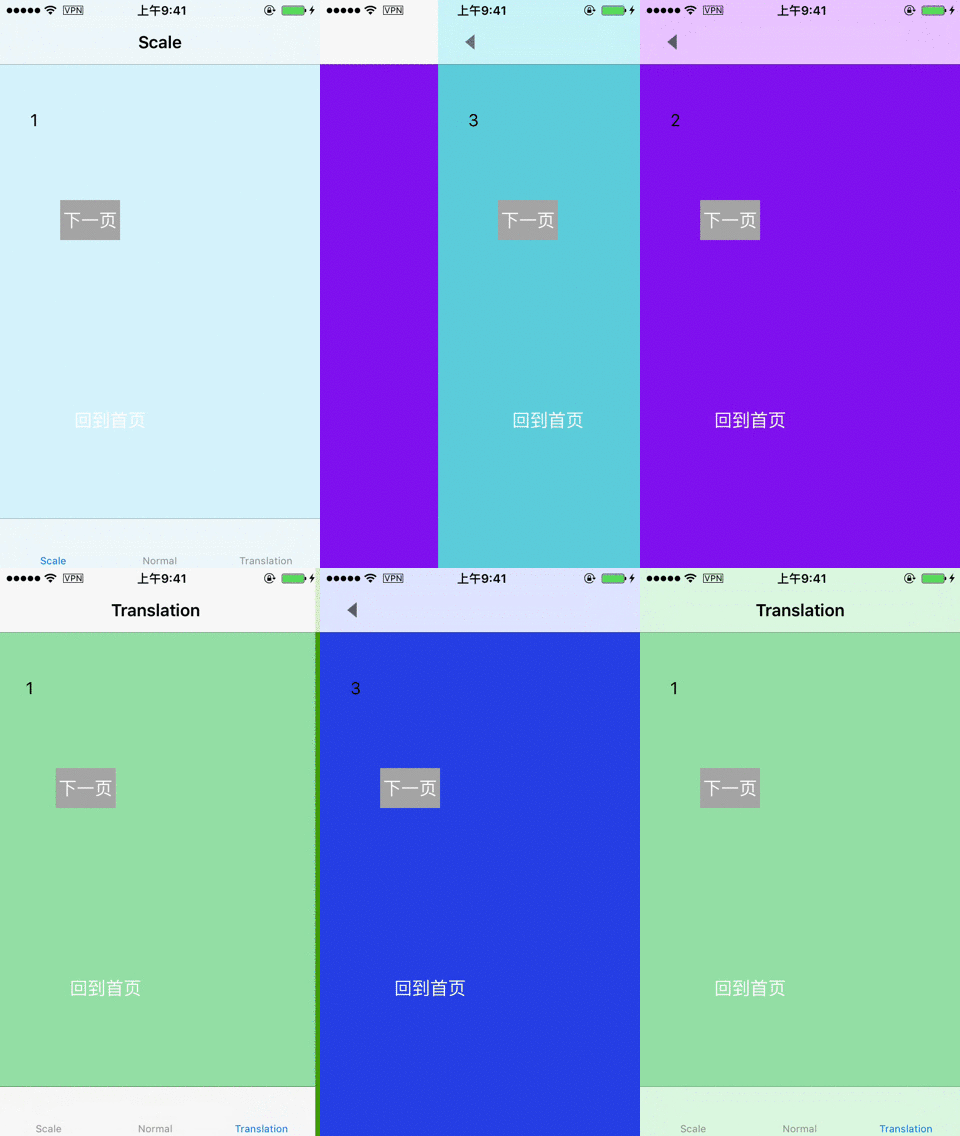
swift语言实现导航栏全屏返回的效果,三种popViewController的效果,例如淘宝、京东的“整体返回”效果。三种效果分别是页面收缩效果,无动画效果,平移效果。
详细
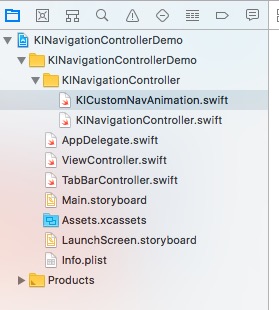
##运行效果  ##实现思路 创建pan手势,添加到页面中,监听手势的动作。重写push的方法,在push之前截图保存到数组。重写pop的方法,在pop之前删除截图。pop的动画效果是利用截图的image添加到topView上,从视觉效果上实现缩放、平移的动画效果。以下是具体的实现思路: 1.创建Pan手势识别器 ``` delegate = self let panRecognizer = UIPanGestureRecognizer(target: self, action: #selector(paningGestureReceive(recoginzer:))) panRecognizer.delegate = self view.addGestureRecognizer(panRecognizer) //实现侧滑返回 interactivePopGestureRecognizer?.delegate = self ``` 2.实现手势的相应事件 ``` //MARK: - Events @objc func paningGestureReceive(recoginzer:UIPanGestureRecognizer) { //如果只有一个控制器或者不允许全屏返回,return if self.viewControllers.count <= 1 || !canDragBack { return } let touchPoint = recoginzer.location(in: UIApplication.shared.keyWindow) switch recoginzer.state { case .began: isMoving = true startTouch = touchPoint if backgroundView == nil { let frame = TOP_VIEW?.frame backgroundView = UIView(frame: CGRect(x: 0, y: 0, width: (frame?.size.width)!, height: (frame?.size.height)!)) TOP_VIEW?.superview?.insertSubview(backgroundView!, belowSubview: TOP_VIEW!) blackMask = UIView(frame: CGRect(x: 0, y: 0, width: (frame?.size.width)!, height: (frame?.size.height)!)) blackMask?.backgroundColor = UIColor.black backgroundView?.addSubview(blackMask!) } backgroundView?.isHidden = false if lastScreenShotView != nil { lastScreenShotView?.removeFromSuperview() } let lastScreenShot = screenShotsList.lastObject as! UIImage lastScreenShotView = UIImageView(image: lastScreenShot) backgroundView?.insertSubview(lastScreenShotView!, belowSubview: blackMask!) break case .ended: //手势结束,判断是返回还是回到原位 if touchPoint.x - (startTouch?.x)! > 50 { UIView.animate(withDuration: 0.3, animations: { self.moveView(withX: self.kMAXWidth) }, completion: { (finished:Bool) in self.popViewController(animated: false) var frame = self.TOP_VIEW?.frame frame?.origin.x = 0 self.TOP_VIEW?.frame = frame! self.isMoving = false self.backgroundView?.isHidden = true // End paning,remove last screen shot self.customAnimation.removeLastScreenShot() }) } else { UIView.animate(withDuration: 0.3, animations: { self.moveView(withX: 0) }, completion: { (finished:Bool) in self.isMoving = false self.backgroundView?.isHidden = true }) } return //直接返回,不在往下执行 case .cancelled: UIView.animate(withDuration: 0.3, animations: { self.moveView(withX: 0) }, completion: { (finished:Bool) in self.isMoving = false self.backgroundView?.isHidden = true }) return default: break } if isMoving! { self.moveView(withX: touchPoint.x - (startTouch?.x)!) } } ``` 3.创建截图需要的backgroundView和作为遮罩的blackMask,存放截图所需的数组 ``` if backgroundView == nil { let frame = TOP_VIEW?.frame backgroundView = UIView(frame: CGRect(x: 0, y: 0, width: (frame?.size.width)!, height: (frame?.size.height)!)) TOP_VIEW?.superview?.insertSubview(backgroundView!, belowSubview: TOP_VIEW!) blackMask = UIView(frame: CGRect(x: 0, y: 0, width: (frame?.size.width)!, height: (frame?.size.height)!)) blackMask?.backgroundColor = UIColor.black backgroundView?.addSubview(blackMask!) } backgroundView?.isHidden = false if lastScreenShotView != nil { lastScreenShotView?.removeFromSuperview() } let lastScreenShot = screenShotsList.lastObject as! UIImage lastScreenShotView = UIImageView(image: lastScreenShot) backgroundView?.insertSubview(lastScreenShotView!, belowSubview: blackMask!) ``` 4.在push前截图,并保存 ``` override func pushViewController(_ viewController: UIViewController, animated: Bool) { if self.viewControllers.count >= 1 { let screenshot = getScreenshot() if screenshot != nil { screenShotsList.add(screenshot!) } } super.pushViewController(viewController, animated: animated) } ``` 5.重写常用的pop方法,在pop前删除相应的截图 ``` @discardableResult override func popViewController(animated: Bool) -> UIViewController? { screenShotsList.removeLastObject() return super.popViewController(animated: animated) } override func popToViewController(_ viewController: UIViewController, animated: Bool) -> [UIViewController]? { var removeCount = 0 for i in stride(from: viewControllers.count-1, to: 0, by: -1) { if viewController == viewControllers[i] { break } screenShotsList.removeLastObject() removeCount = removeCount+1 } customAnimation.removeCount = removeCount return super.popToViewController(viewController, animated: animated) } override func popToRootViewController(animated: Bool) -> [UIViewController]? { screenShotsList.removeAllObjects() customAnimation.removeAllScreenShot() return super.popToRootViewController(animated: animated) } ``` 到此处能实现手势整体返回的效果,要实现点击返回按钮也能整体返回,需要自定义返回动画。实现协议`UIViewControllerAnimatedTransitioning`。 6.让navigationController遵守UINavigationControllerDelegate实现下面的方法,在方法里面可根据operation判断需要自定义的类型(pop/push) ``` func navigationController(_ navigationController: UINavigationController, animationControllerFor operation: UINavigationControllerOperation, from fromVC: UIViewController, to toVC: UIViewController) -> UIViewControllerAnimatedTransitioning? ``` 7.使用一个类实现UIViewControllerAnimatedTransitioning协议 ``` func transitionDuration(using transitionContext: UIViewControllerContextTransitioning?) -> TimeInterval //定义动画 func animateTransition(using transitionContext: UIViewControllerContextTransitioning) ``` ##项目结构图 
本实例支付的费用只是购买源码的费用,如有疑问欢迎在文末留言交流,如需作者在线代码指导、定制等,在作者开启付费服务后,可以点击“购买服务”进行实时联系,请知悉,谢谢
感谢
1
手机上随时阅读、收藏该文章 ?请扫下方二维码
相似例子推荐
评论
作者
Elina
3
例子数量
31
帮助
4
感谢
评分详细
可运行:
4.5
分
代码质量:
4.5
分
文章描述详细:
4.5
分
代码注释:
4.5
分
综合:
4.5
分
作者例子
iOS仿支付宝首页的刷新布局效果
JS与原生OC/Swift相互调用总结
KINavigationController使用演示例子