文字(符号化/图像化)转换工具的实现
技术:c# WFM
概述
此工具,将任意文字 转换为 像素级别的 图像或文本,很酷炫,是对C# wfm 图像处理的一种应用。对于表达 重要 信息 ,传送重要信息,是个不错的选择。
详细
效果展示

原理
上面酷炫的效果, 实现的原理是, 利用 C# wfm, Graphics 类, 先画出 相关字体,转换为 Bitmap类, 再根据 传入的 遍历的 像素方格的大小, 以此为单位, 检测 对应的位置的像素的 颜色, 进而设置为新的颜色, 拼接新的字符串,
最后,在form 上 进行展示, textTextBox 设置对应的字符串即可。
工具实现过程
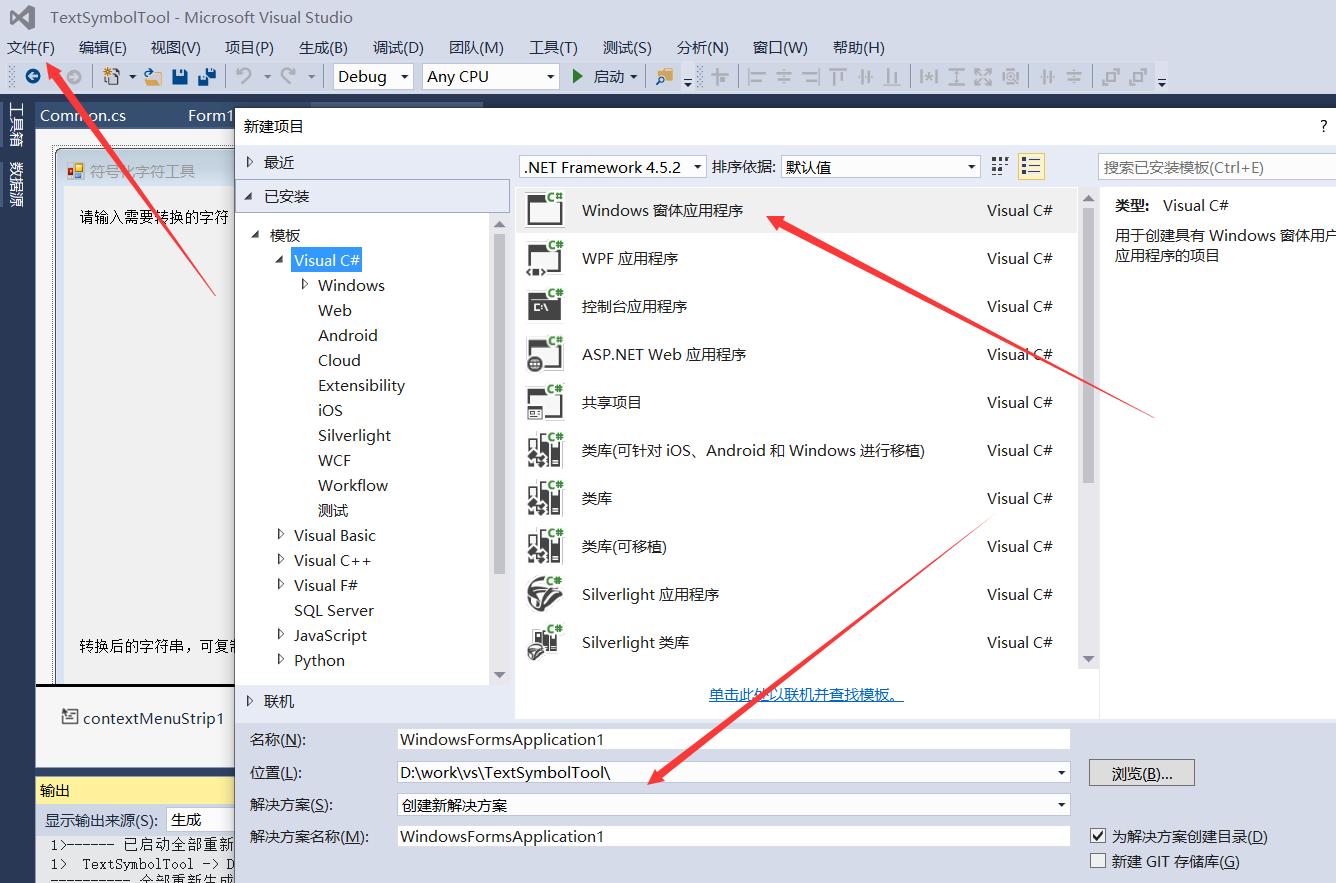
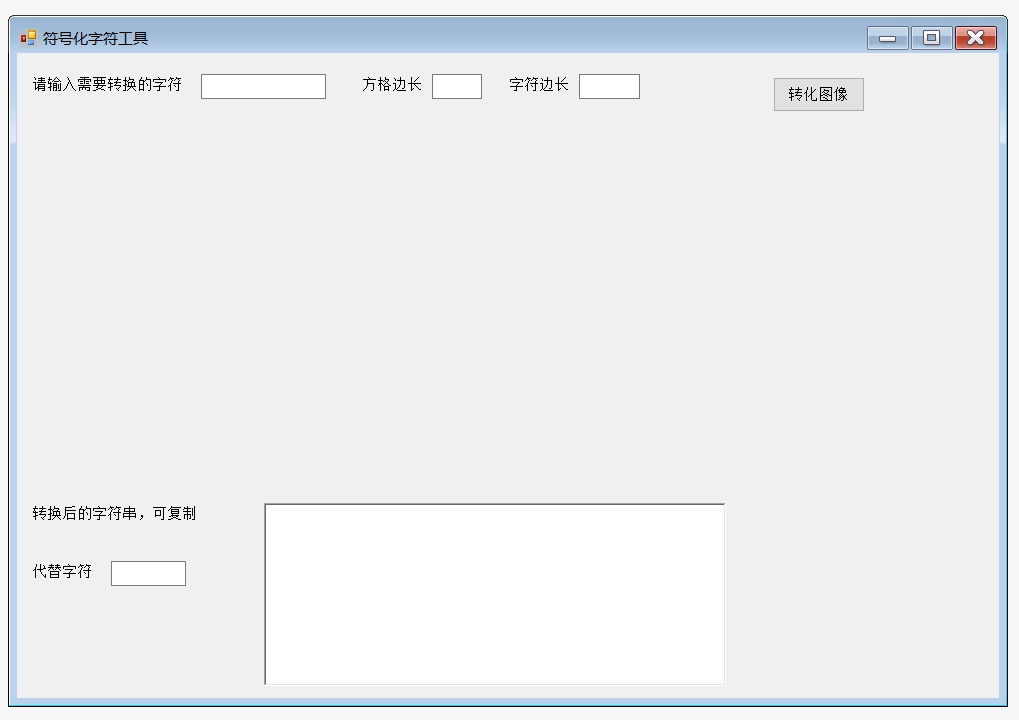
1.准备c# WFM窗体应用程序(作为入口)
如下图, 创建窗体程序以及相关的控件(输入框、按钮等)


2. 添加 设置基本参数的方法
在common 类中 加入
        public static int oneGirdWidth;
        public static int oneItemSideLenghth;
        public static string strNeedShow;

        public static int showStrWidth;
        public static Graphics formG;
        public static Bitmap orgBm;
        public static Form curForm;
        public static String strReplace = "";
        public static RichTextBox richBox;

        public static void setArges(string orgOneGirdWidth, string orgOneItemWidth, string orgStrNeedShow, Form orgCurForm, RichTextBox curRichBox, string orgReplace)  // 点击的时候传入
        {
            oneGirdWidth = int.Parse(orgOneGirdWidth);
            oneItemSideLenghth = int.Parse(orgOneItemWidth);
            strNeedShow = orgStrNeedShow;
            curForm = orgCurForm;
            richBox = curRichBox;
            strReplace = orgReplace;
        }
3. 画字
声明 Bitmap orgBm 类, 根据传入参数,设置 大小,画出 所需的字体。具体代码如下
    public static void drawText()
            {
                showStrWidth = strNeedShow.Length * oneItemSideLenghth;

                Size orgForm = curForm.Size;
                if (showStrWidth > orgForm.Width || orgForm.Width > 1000) {
                    curForm.Size = new Size(showStrWidth + 40, orgForm.Height);
                }
                if(formG!= null)
                {
                    formG.Clear(curForm.BackColor);
                }

                formG = curForm.CreateGraphics();

                orgBm = new Bitmap(strNeedShow.Length  * oneItemSideLenghth, oneItemSideLenghth);
                Graphics g = Graphics.FromImage(orgBm);
                g.SmoothingMode = SmoothingMode.AntiAlias;
                g.InterpolationMode = InterpolationMode.HighQualityBicubic;
                g.CompositingQuality = CompositingQuality.HighQuality;
                FontFamily fontFamily = new FontFamily("黑体");
                Font curFont = new Font(fontFamily, oneItemSideLenghth, FontStyle.Regular, GraphicsUnit.Pixel);
                g.DrawString(strNeedShow, curFont, Brushes.Black, 0, 0, StringFormat.GenericTypographic);
                g.Dispose();

}4. 切边处理
因为 画出的字体, 四周是有空白像素的, 所以需要去掉, 需要遍历四周的空白像素, 原理就是 找到 四周第一次 出现 透明度不为0的位置,重新裁切即可,具体代码如下
 public static void TrimDeal()
        {
            //showStrWidth ,  oneItemSideLenghth

            int startX = 0, endX = 0, startY = 0, endY = 0;
            int x, y;
            for (y = 0; y < oneItemSideLenghth; y++)
            {
                if (startY != 0) break;
                for (x = 0; x < showStrWidth; x++)
                {
                    if (orgBm.GetPixel(x, y).A != 0 && startY == 0)
                    {
                        startY = y;
                        break;
                    }
                }
            }

            for (y = oneItemSideLenghth - 1; y >= 0; y--)
            {
                if (endY != 0) break;
                for (x = showStrWidth - 1; x >= 0; x--)
                {
                    if (orgBm.GetPixel(x, y).A != 0 && endY == 0)
                    {
                        endY = y;
                        break;
                    }
                }
            }

            for (x = 0; x < showStrWidth; x++)
            {
                if (startX != 0) break;
                for (y = 0; y < oneItemSideLenghth; y++)
                {
                    if (orgBm.GetPixel(x, y).A != 0 && startX == 0)
                    {
                        startX = x;
                        break;
                    }
                }
            }

            for (x = showStrWidth - 1; x >= 0; x--)
            {
                if (endX != 0) break;
                for (y = 0; y < oneItemSideLenghth; y++)
                {
                    if (orgBm.GetPixel(x, y).A != 0 && endX == 0)
                    {
                        endX = x;
                        break;
                    }
                }
            }

            Color pixel;

            int afterWidth = endX - startX + 1;
            int afterHeight = endY - startY + 1;

            Bitmap resBm = new Bitmap(afterWidth, afterHeight);
            int x2, y2;
            for (y2 = 0; y2 < afterHeight; y2++)
            {
                for (x2 = 0; x2 < afterWidth; x2++)
                {
                    pixel = orgBm.GetPixel(startX + x2, startY + y2);
                    resBm.SetPixel(x2, y2, Color.FromArgb(pixel.A, pixel.R, pixel.G, pixel.B));
                }
            }
            orgBm = resBm;


    }
5. 符号化/图像化 转换 文字
此为最后一步, 经过上述几步, 文字已经存储到了 Bitmap orgBm 中了, 需要遍历每个像素, 进行重新设置 像素块的颜色,还有字符串的拼接,具体代码如下:
 public static void dealText()
        {
            int symbolSize = oneGirdWidth;
            int imgHeight = orgBm.Height;
            int imgWidth = orgBm.Width;

            string changeStr = "";
            Random rd = new Random();
            int x2, y2;
            int hegihtTemp = imgHeight / symbolSize;
            int widthTemp = imgWidth / symbolSize;
            for (y2 = 0; y2 < hegihtTemp; y2++)
            {
                int curY = y2 * symbolSize;
                for (x2 = 0; x2 < widthTemp; x2++)
                {
                    int curX = x2 * symbolSize;
                    Color pixel = orgBm.GetPixel(curX, curY);
                    Color tempColor = new Color();
                    tempColor = Color.FromArgb(255, 255, 255, 255);

                    if (pixel.A == 255)
                    {
                        formG.FillRectangle(new SolidBrush(tempColor), new Rectangle(curX + 10, curY + 60, symbolSize, symbolSize));
                        // formG.DrawString(writeStr, f, Brushes.Black, curX, curY, StringFormat.GenericTypographic);
                        // g.FillRectangle(new SolidBrush(Color.FromArgb(255, rd.Next(0, 255), rd.Next(0, 255), rd.Next(0, 255))), new Rectangle(curX, curY, symbolSize, symbolSize));
                        if (strReplace != "")
                        {
                            changeStr = changeStr + strReplace;

                        }
                    }
                    else
                    {
                        formG.FillRectangle(new SolidBrush(Color.FromArgb(255, rd.Next(0, 255), rd.Next(0, 255), rd.Next(0, 255))), new Rectangle(curX + 10, curY + 60, symbolSize, symbolSize));
                        //formG.DrawString((char)rd.Next(32, 126) + "", f, Brushes.Black, curX, curY, StringFormat.GenericTypographic);
                        if (strReplace != "") {
                            changeStr = changeStr + " ";

                        }
                    }
                }
                changeStr = changeStr + "\n";
            }
            richBox.Text = "";
            if (strReplace != "")
            {
                richBox.Text = changeStr;

            }
        }
总结
此工具, 代码不是很多,但是效果很棒, 可以根据源代码,再加工加工,显示出更炫的效果, 比如随机符号化,等等效果,此处就不再详述。核心思想就是 遍历像素点,进行设置修改设置图像。
最后,请多多支持。
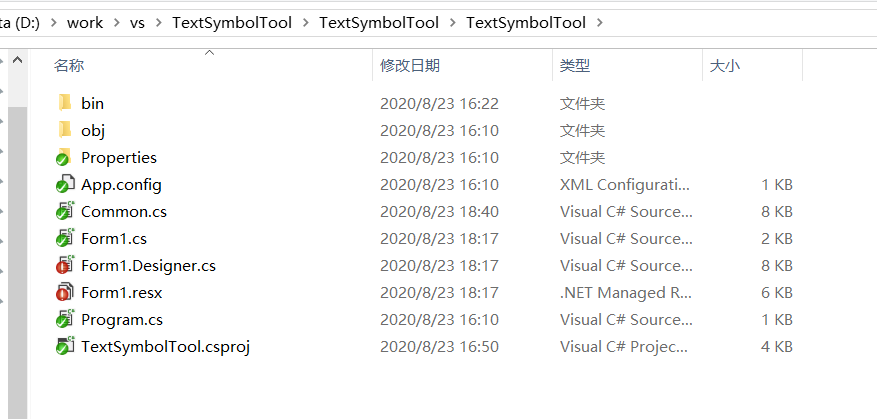
项目结构图

本实例支付的费用只是购买源码的费用,如有疑问欢迎在文末留言交流,如需作者在线代码指导、定制等,在作者开启付费服务后,可以点击“购买服务”进行实时联系,请知悉,谢谢
手机上随时阅读、收藏该文章 ?请扫下方二维码


